
Falling For Vertigo: Reimagining Hitchcock’s San Francisco Through My Lens
What happens when you take a 1958 Hitchcock masterpiece, a willing model, three San Francisco locations, several costume changes, one very long drive from Los Angeles and probably a bit too much enthusiasm?
You get one of the most enjoyable and rewarding photoshoots I’ve ever done.
Before photography became such a big part of my life, I spent many years working in the movie industry at one of the world’s biggest studios, marketing blockbuster movies and some pretty beloved TV shows. So I’ve always had a fascination with movies and how great filmmakers create memorable images.
These days, I’m constantly looking for inspiration for my own photography, particularly concepts that are a little different, visually striking and, most importantly, fun to shoot.
After years of shooting around Los Angeles, though, I was itching for a change.
I love LA, but there’s something good about putting yourself somewhere unfamiliar. You have to work a bit harder. You don’t already know all the best angles or exactly where the sun will be. You have to hunt for compositions and deal with whatever the location, light, weather and general public decide to throw at you.
Which brings me to Alfred Hitchcock.
FALLING FOR VERTIGO
Hitchcock has always been one of my favorite directors and Vertigo is one of those movies I can happily watch again and again.
Made in 1958 and starring James Stewart and Kim Novak, it also happens to feature San Francisco almost as another character in the movie. The Golden Gate Bridge, steep streets, grand old buildings, fog, water and those wonderfully rich 1950s colors are all over it.
I watched it again recently and at some point thought:
Wouldn’t it be fun to use some of these scenes as inspiration for a photoshoot?
I wasn’t interested in trying to painstakingly copy every frame. I wanted to use the originals as inspiration and create my own versions, while keeping enough of the look and feel that anyone who knows Vertigo would immediately get the connection.
Once I had the idea, I got slightly obsessed with it.
I started researching the original Vertigo filming locations in San Francisco, comparing scenes from the movie with how the locations look today. Eventually I settled on three scenes centered around Kim Novak’s character, Madeleine.
Next came the mood boards.
I pulled together images showing the locations, poses, compositions and wardrobe, then posted a casting call in a San Francisco Facebook group looking for someone interested in becoming my modern-day Madeleine.
Quite a few people responded.
Eventually I found Alyona.
She looked the part, but more importantly, she really got into the idea. She watched the movie, did some research of her own and started assembling outfits inspired by Kim Novak’s wardrobe.
We settled on Labor Day weekend.
All I had to do now was drive from Los Angeles to San Francisco.
Five hours.
Which feels considerably longer somewhere around hour four.
Vertigo Photoshoot - Locations, Scenes, Wardrobe Planning Documents...
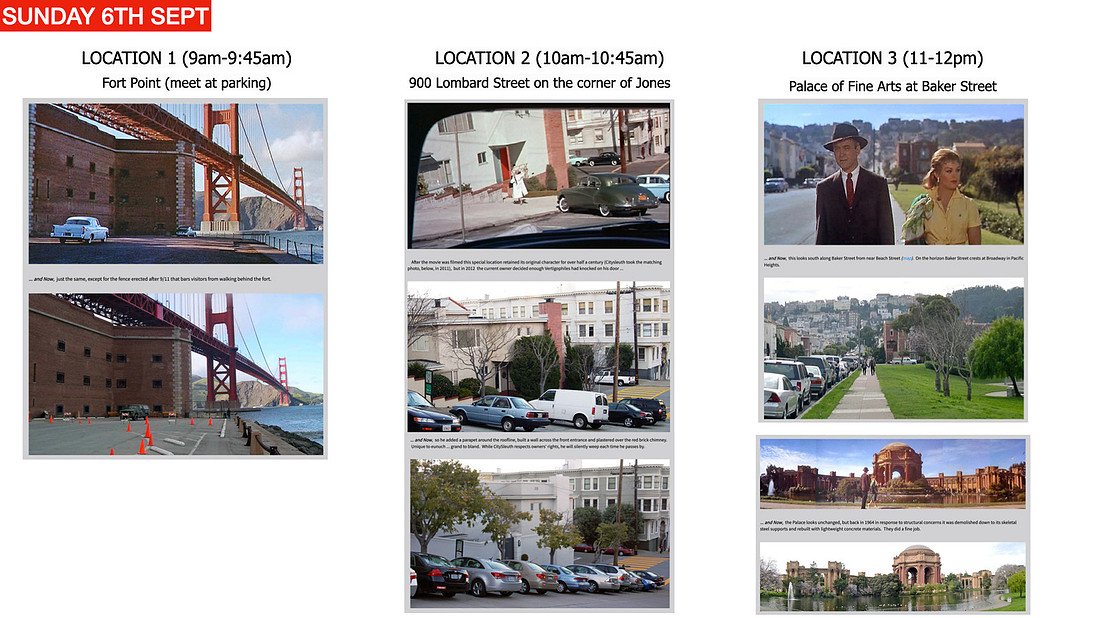

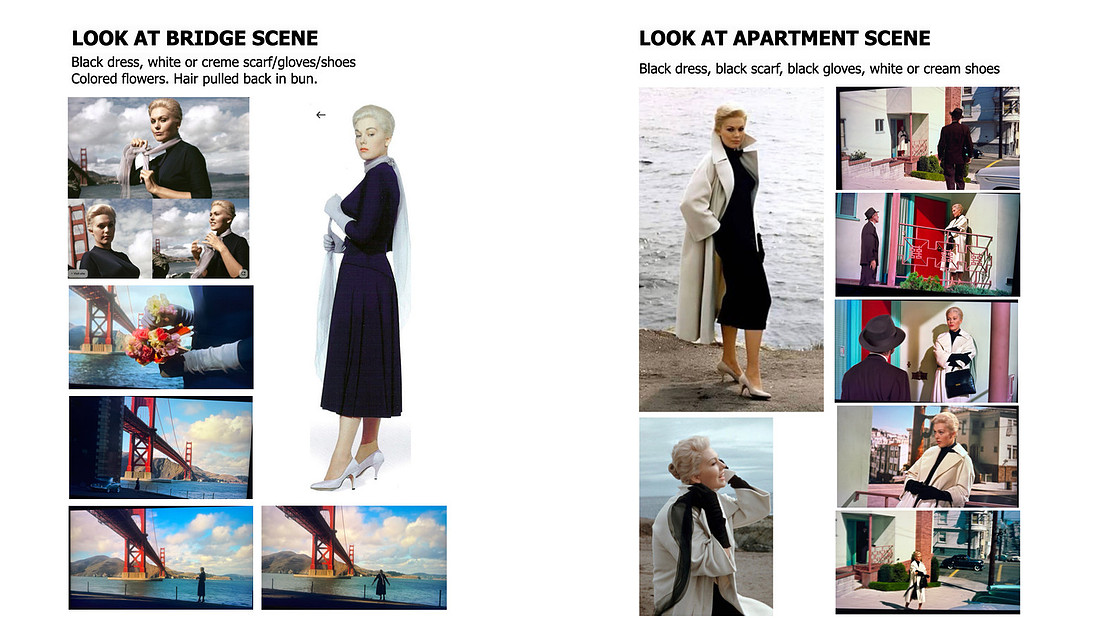
SCENE ONE: FORT POINT AND THE GOLDEN GATE BRIDGE
We met at 9:30 Saturday morning at historic Fort Point, directly beneath the southern end of the Golden Gate Bridge.
We immediately got lucky.
The light was beautiful.
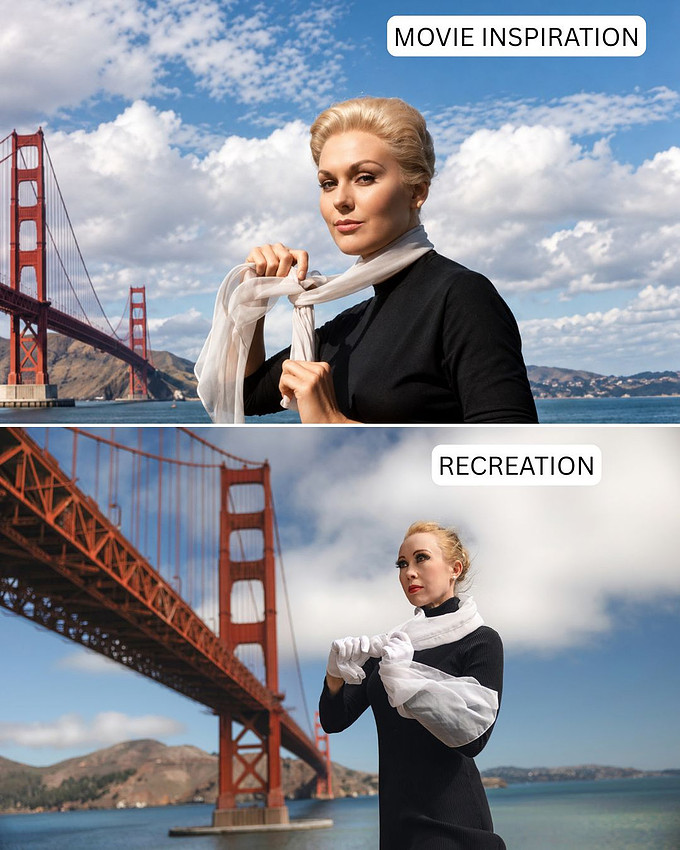
Blue sky, scattered clouds and a mixture of direct and softer light that was surprisingly close to the conditions in the original movie scene.
This was the location of one of Vertigo’s most famous sequences. Madeleine enters the water beneath the Golden Gate Bridge and Scottie, played by James Stewart, dives in and rescues her.
No, I didn’t make Alyona jump into San Francisco Bay.
There are limits.
Instead, we spent about 30 to 40 minutes shooting around the waterfront, sometimes using Hitchcock’s original composition as our starting point and sometimes finding angles of our own.
As the morning went on, more people started appearing and getting clean compositions became increasingly difficult.
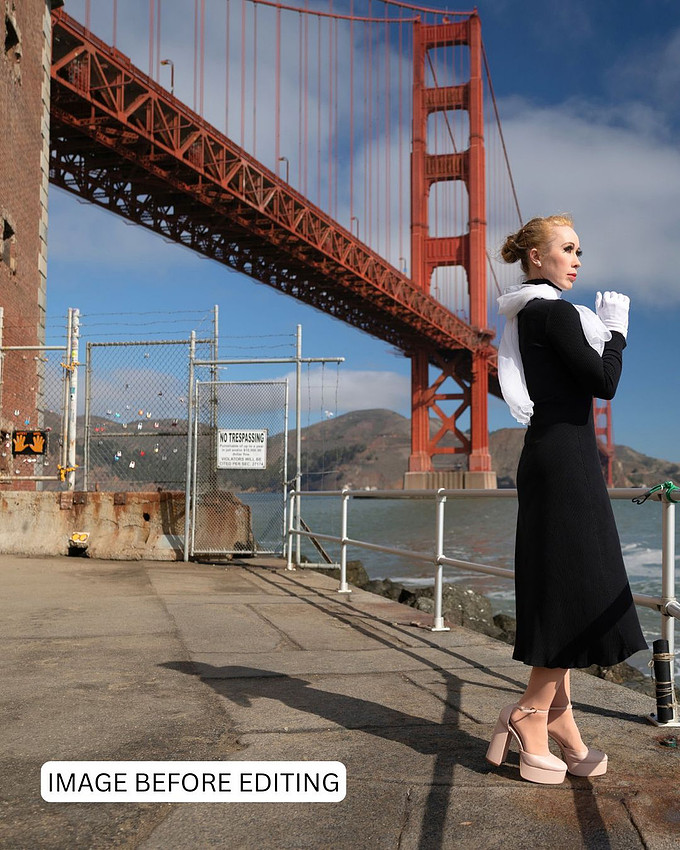
There were also a few things Hitchcock hadn’t had to deal with in 1958. Modern railings, concrete barriers, signs, tourists and assorted other clutter had appeared over the intervening 68 years.
Looking at the shots on the back of the camera, I knew there was going to be quite a bit of Photoshop involved later.
But I also knew we had some really good stuff.
Restored inspiration images from the filming of Hitchcock’s Vertigo (1958) alongside our interpretation - Fort Point, San Francisco...
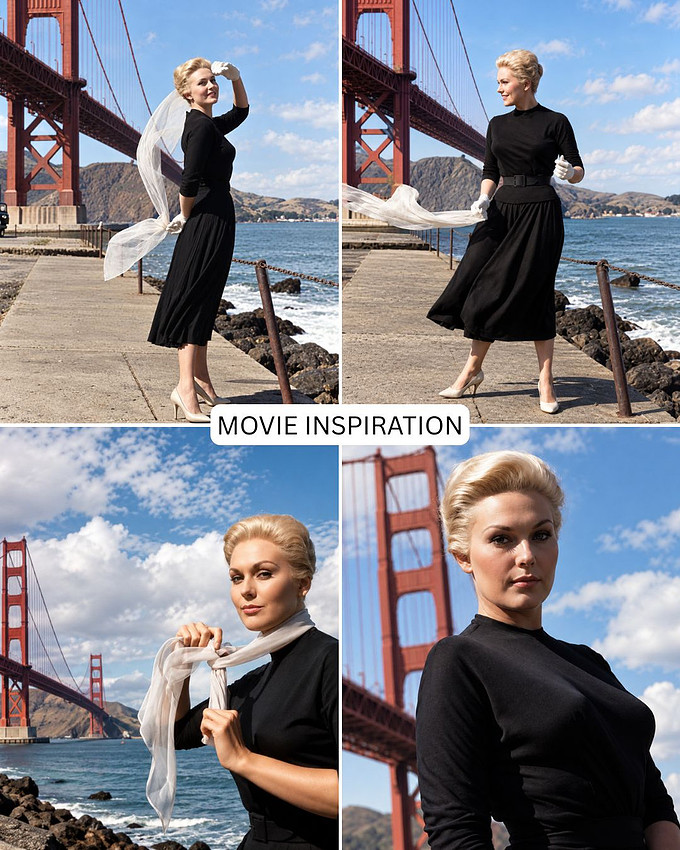
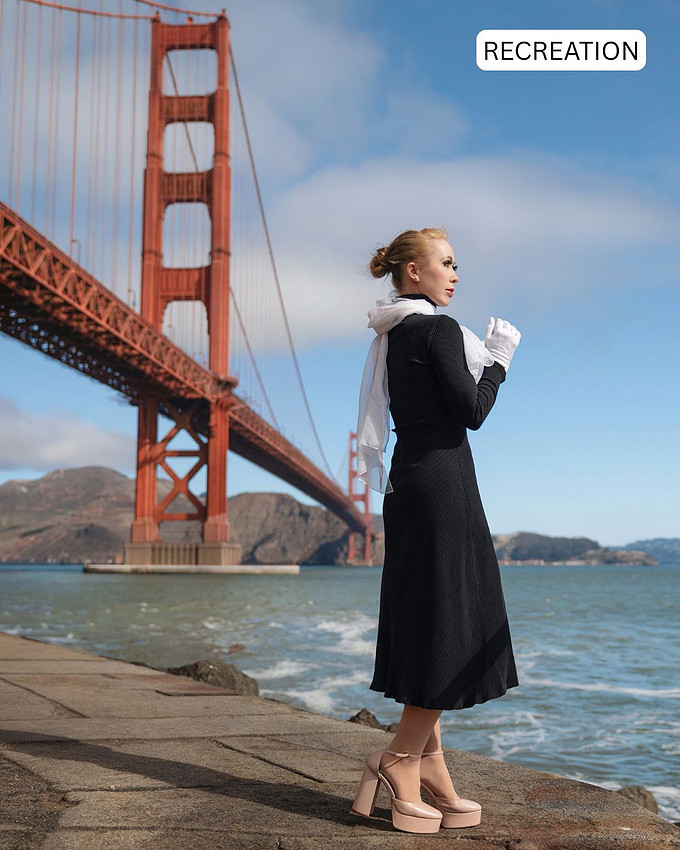
For reference, below is the unedited version of the above scene and you can see why I decided to remove the distracting concrete barrier and metal fencing...
By now Fort Point itself had opened, so we headed inside and climbed the stairs to the roof.
If you’ve never been up there, the view is pretty spectacular.
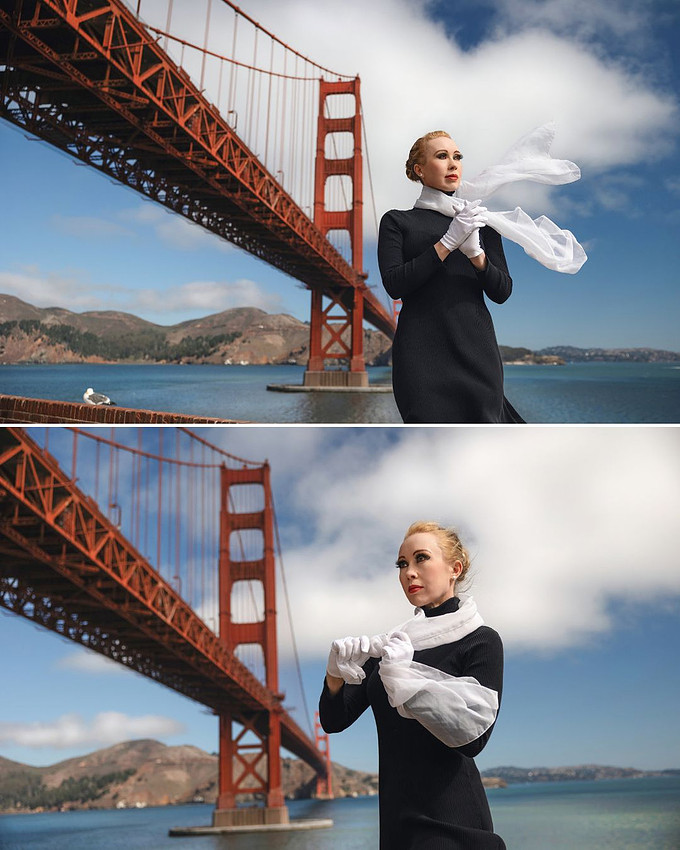
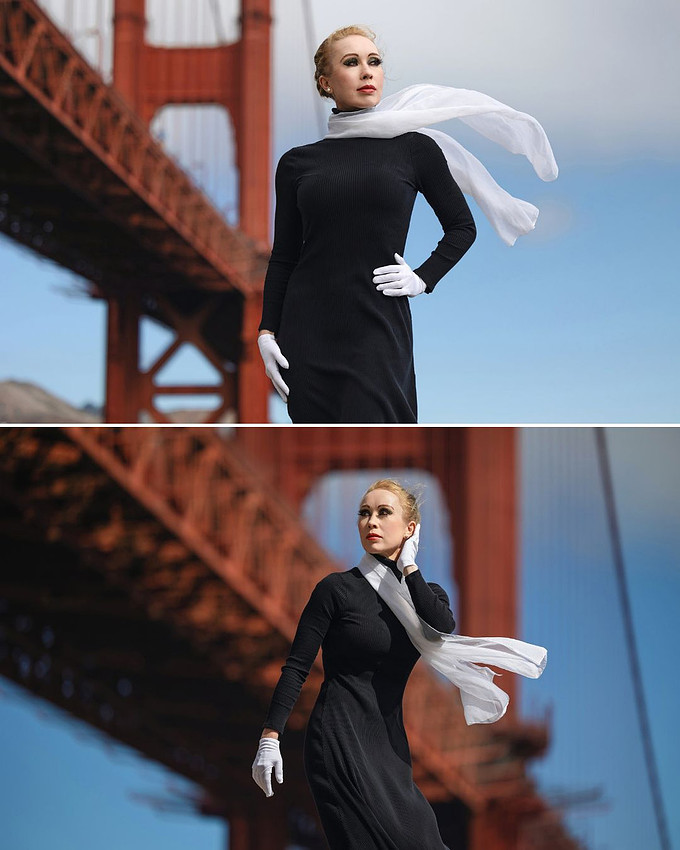
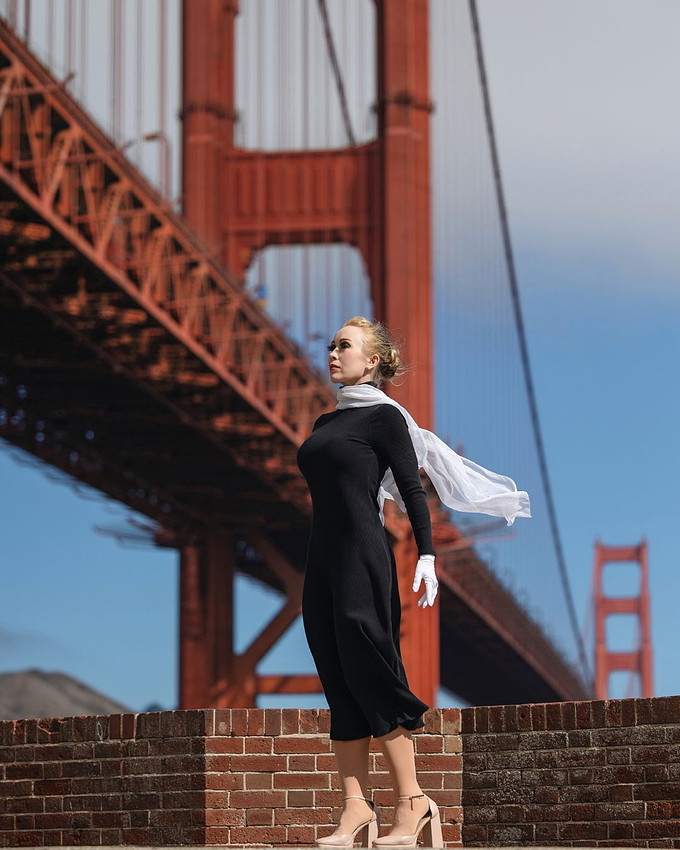
You emerge almost directly underneath the Golden Gate Bridge, with this enormous structure looming above you. It’s a completely different view from the familiar postcard angle and a fantastic place to shoot.
Alonya slipped straight back into character and even the wind decided to help us out. It caught her scarf and blew it out behind her, adding exactly the kind of drama I wanted.
You can plan a shoot down to the smallest detail, but sometimes it’s the completely random stuff that gives you the best photograph.
We shot stills and a few video clips up there for another 45 minutes or so, then headed back down, stopping for a few interior shots inside the fort along the way.
First location done.
And already worth the drive.
Fort Point rooftop portraits beneath the Golden Gate Bridge...
SCENE TWO: SCOTTIE'S APARTMENT
Next we all piled into my car and headed over to Lombard Street.
Not the ridiculously crooked section that appears in a million tourist photographs, but about a block below it.
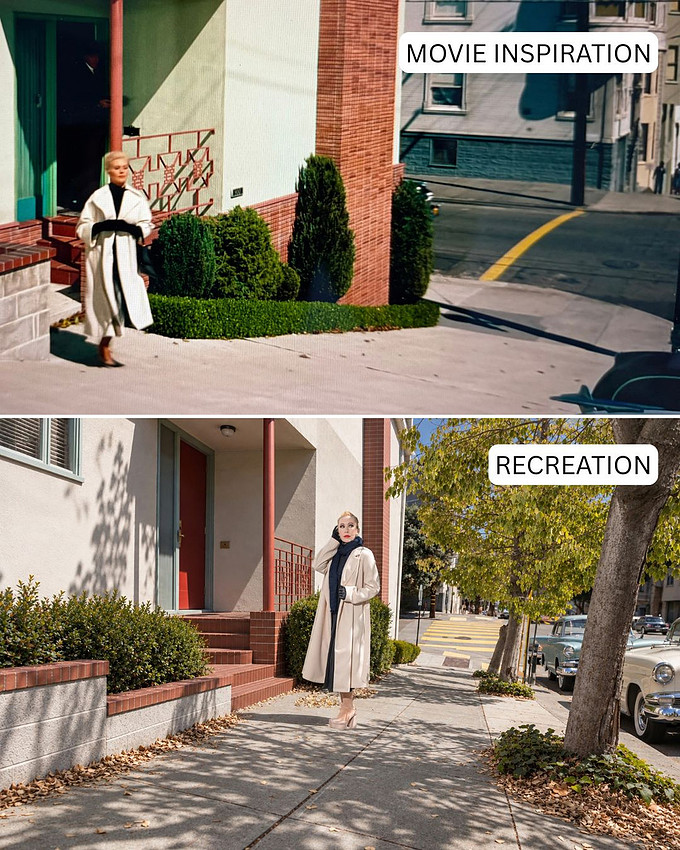
This is where Scottie’s apartment was located in Vertigo.
The building is still there, although it looks rather different today.
The basic architecture is recognizable, but there have obviously been changes over the years. Most noticeably, there’s now a substantial wall obscuring much of the entrance. I suspect the owners may have got a little tired of Vertigo fans standing outside taking photographs.
Which, considering what we were about to do, is probably understandable.
Somehow, I managed to snag a parking space almost directly outside.
In San Francisco.
On Labor Day weekend.
Possibly my greatest achievement of the entire trip.
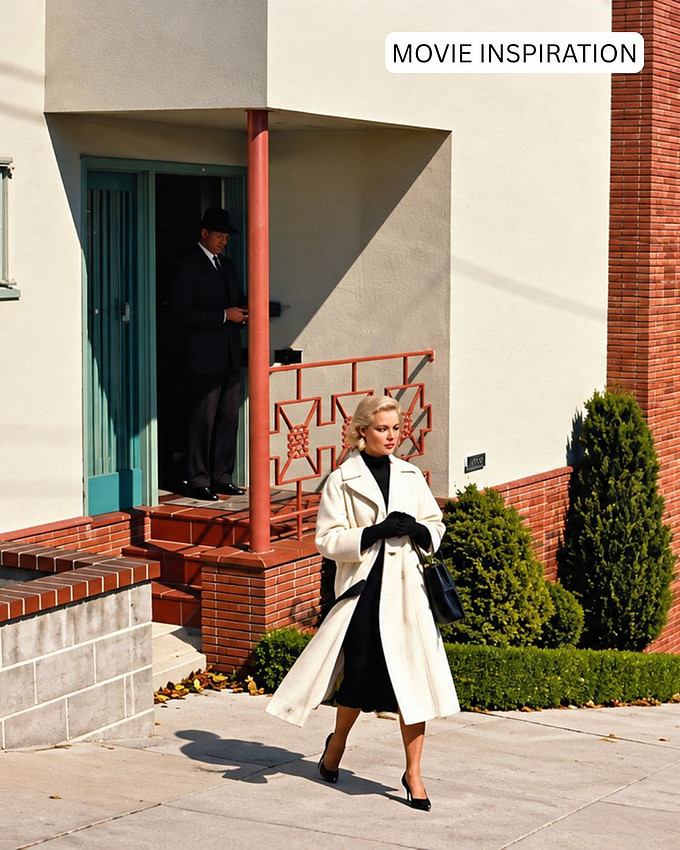
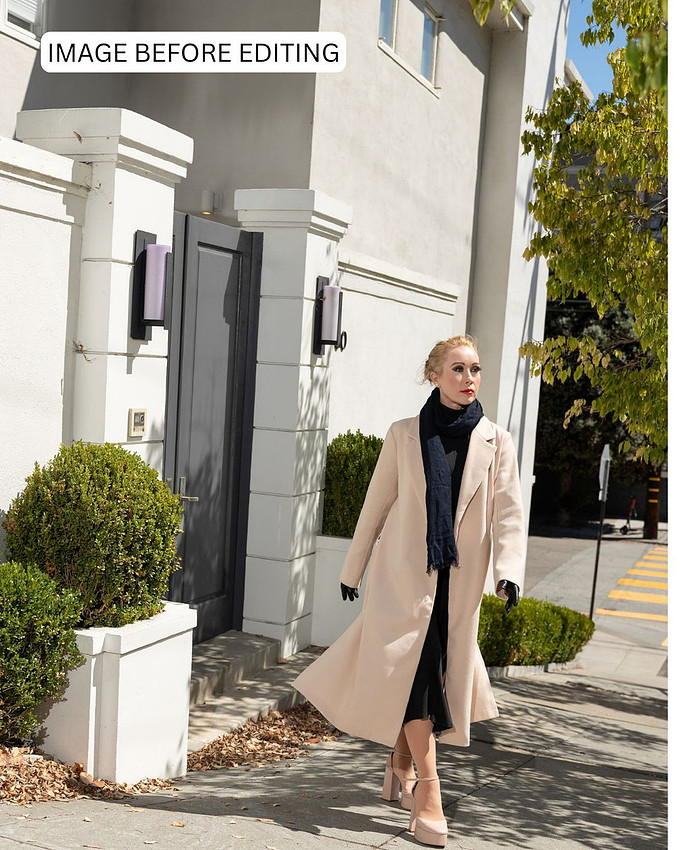
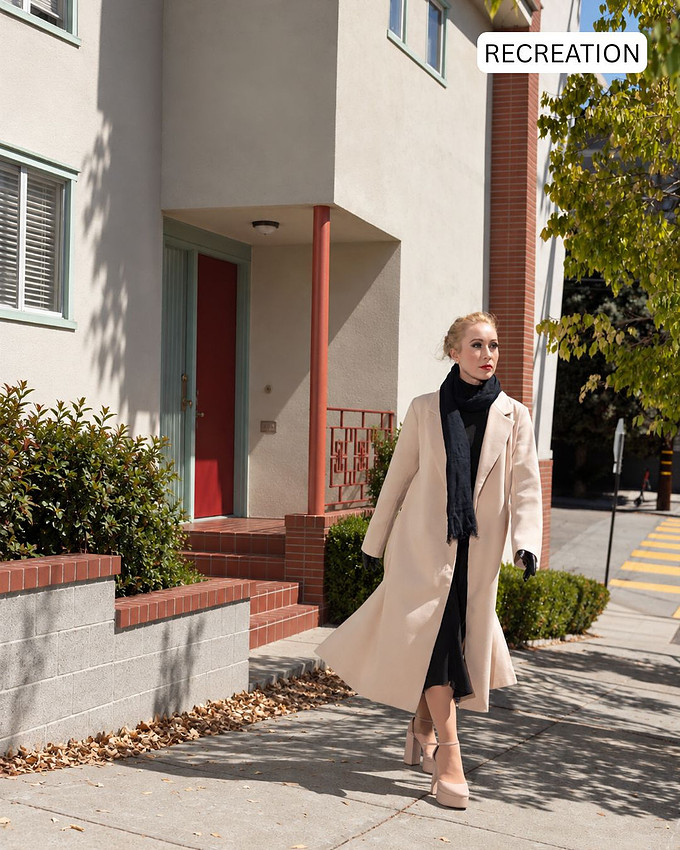
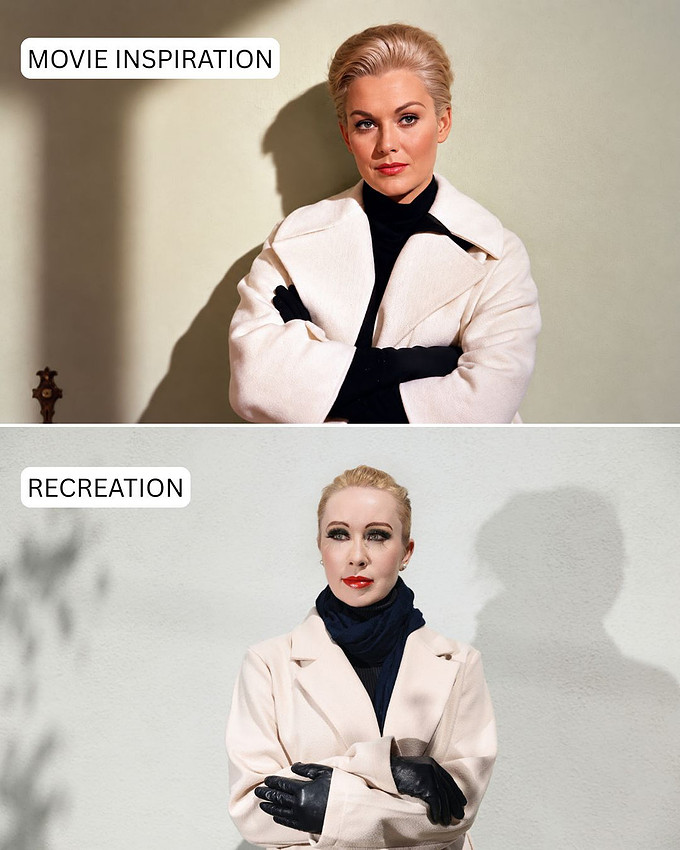
We set about recreating the scenes where Madeleine arrives at Scottie’s apartment and later leaves.
This time the problem wasn’t tourists. It was the sun.
The midday light was really harsh and created deep shadows across Alyona’s face and clothes. Initially we tried using a reflector, but it was too windy for my assistants to control properly. Reflectors can also be uncomfortable for models because you’re effectively bouncing a load of bright sunlight straight into their face.
So out came my Godox AD200 flash.
Using a flash on a bright sunny day can sound a little strange if you’re not into photography. Why add more light when there’s already too much of it?
The trick is that you’re not really adding light to the whole scene. You’re just putting enough onto the subject to soften those deep shadows.
It worked much better.
We got the shots and moved on.
I already knew these images were going to need more work afterwards than the Fort Point photographs. Parts of the house would have to be reconstructed and the modern cars certainly weren’t helping my attempt to create 1958 San Francisco.
That became part of the fun of the project. I could shoot what actually exists today, then use Photoshop and some newer AI editing tools afterwards to bring back elements that disappeared decades ago.
Restored inspiration images from outside 'Scotties Apartment' along with our interpretations...
SCENE THREE: THE PALACE OF FINE ARTS
By this point we had completely blown my original schedule.
We were tired.
We were hungry.
But we’d come this far.
So we headed to the Palace of Fine Arts.
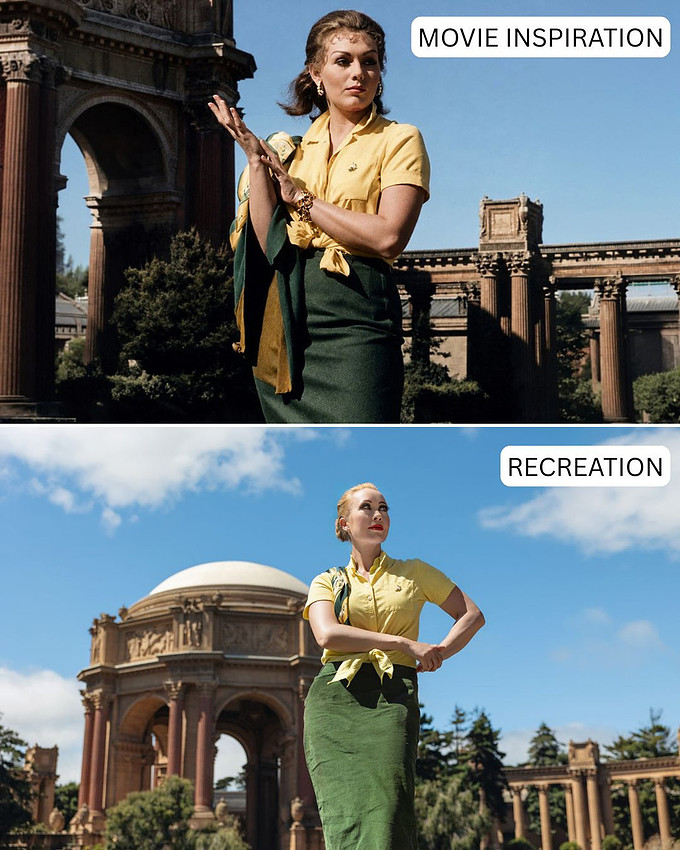
It’s one of those places that almost doesn’t look real. The huge rotunda and columns are spectacular and it’s easy to see why Hitchcock chose it as a location.
Unfortunately, it seemed like most of California had also chosen it as a location that afternoon.
It was packed.
Out came the mood boards again and we started comparing architectural details with frames from the movie, trying to find the exact position Hitchcock had used almost 70 years earlier.
We eventually found it.
Standing there with the original frame on my phone and realizing we were almost exactly where Hitchcock and his crew had once put their camera was actually pretty cool.
We shot several variations from different angles, trying our best to keep Alyona isolated against the architecture while people wandered continuously through the background.
At this point I was mentally adding up the hours I was going to spend removing people in Photoshop.
Alyona had done a great job putting together the wardrobe using clothes she could realistically find, although some details weren’t quite the same as Kim Novak’s original outfit.
I wasn’t too worried about that during the shoot. I’d much rather concentrate on getting the pose, expression, light and composition right while we’re actually there. Clothing details can be adjusted later.
Which is exactly what I did.
I used a combination of Photoshop and AI editing to bring some of those details closer to the original wardrobe.
Then I got a bit carried away.
I added Scottie to one of the photographs.
Why not?
Our re-imagining of Madeleine at the Palace of Fine Arts....
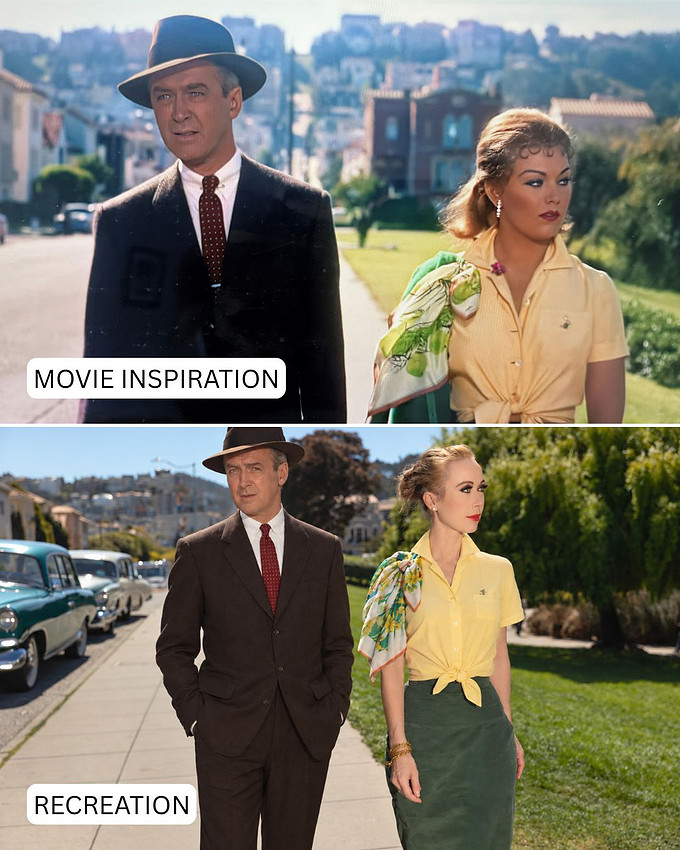
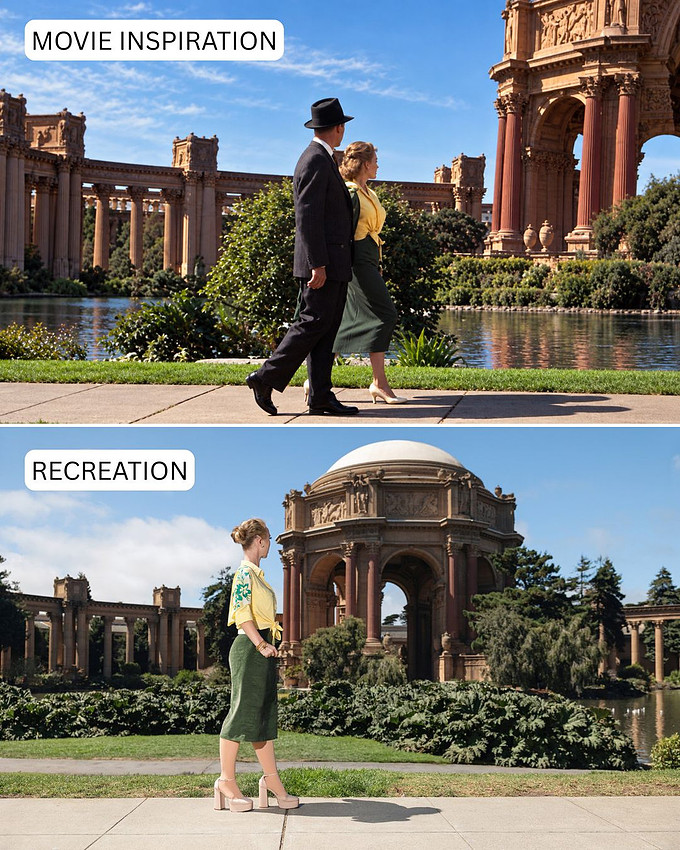
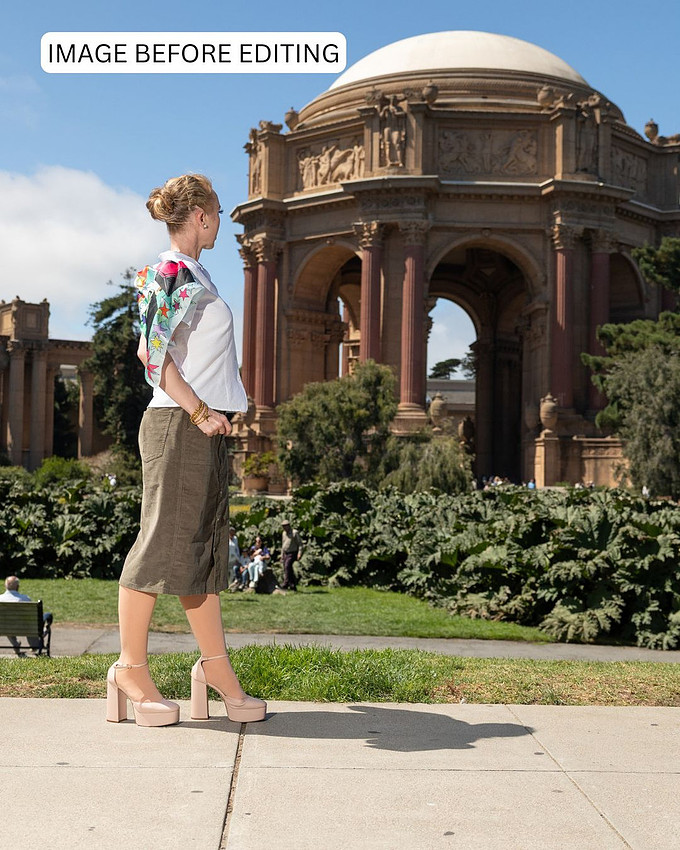
From the image below, you can see how my editing OCD went into overdrive for this scene in particular. It included changing her shirt color from white to yellow, changing the pattern and colors of her shoulder scarf, removing the pockets and buttons on her skirt, adjusting the color of the skirt to better match the one in the movie, and finally removing all the people scattered around the scene.
WHY I ENJOYED THIS SHOOT SO MUCH
We didn’t spend too long at the Palace of Fine Arts. We were already running very late, everyone was tired and the crowds weren’t getting any smaller.
But we had enough.
We called it a wrap.
This ended up being one of the most satisfying shoots I’ve done in years.
Photography can become surprisingly repetitive if you let it. You find locations that work. Lighting setups that work. Poses that work. Editing techniques that work.
Before long, you can find yourself doing variations of things you’ve already done.
This shoot was different.
I had to research the original Vertigo filming locations, study Hitchcock’s compositions, think about wardrobe and character, find a model in another city, deal with locations that had changed dramatically over nearly seven decades, work around tourists, battle midday sun and San Francisco wind, and then figure out how to turn the photographs I actually took into the pictures I’d had in my head before leaving LA.
And I think that’s why I enjoyed it so much.
It wasn’t just a case of turning up somewhere photogenic with a camera and a model.
There was a purpose to every photograph.
SO WHAT'S NEXT?
The only problem with doing a shoot like this is that I now want to do another one.
I’m thinking about turning it into a series, possibly called Radical Recreations, where I take memorable scenes from classic movies and use them as the starting point for new photoshoots.
Not exact copies. My own interpretations.
There are so many great movies, characters and locations to choose from that I already have a few ideas, including The Birds, North by Northwest, Bullet, Dirty Harry, Chinatown, Grease, Die Hard, Mulholland Drive.
But I’d love to hear yours.
What classic movie scene should I try next?
Something iconic. Something visually interesting. Something that would be a real challenge to pull off.
Send me your suggestions.
Bonus points if it’s closer to Los Angeles than San Francisco.
Like/Follow and see more from me....
INSTAGRAM:: @radical_snaps
TIKTOK:: @radicalsnaps
FACEBOOK:: @radicalsnaps
YOUTUBE:: RadicalSnaps
WEBSITE: www.radicalsnaps.com
ALYONA CONTACT/SOCIAL INFO::
INSTAGRAM: @aamasterfit
ALYONA WARDROBE: All her own
A/V EQUIPMENT USED: Camera - Canon R6 Lens, Canon 24-70mm F2.8 L Series, Canon 70-200mm F2.8 L Series, Flash - Godox AD200, Video - Apple iPhone 17 Pro
EDITING: Photography - I used Lightroom Classic for basic enhancements, eg. refine exposure/contrast/saturation, add masks/vignettes. I used Evoto to adjust skin, clothes and some color grading. I used Photoshop CC for removing distractions and some more advanced fixes. I used ChatGPT to generate inspiration images and to help recreate characters, buildings, and vehicles from the 1950s.
FYI, I'm not sponsored and I don't receive compensation from any of the companies listed above (I wish I was!)
